السبت، 3 نوفمبر 2018

أربعة طرق تشغيل أنترنت إنوي inwi على جميع الهواتف

توقف موقع Configuration inwi فترة دامت أكثر من ثلاث أشهر و الآن أصبح يدعم تقريبا جميع الهواتف الذكية (أندرويد و ويندوز فون ....) ، وهذه ميزة تتميز بها إنوي و ميدتيل Meditel كونها توفر لك إرسال بإعدادات الخاصة بهاتفك و تفعيل الأنترنت دون اتصال بهم  (inwi) .
إنوي توفر لي مجموعة من الخدمات لتفعيل أنترنت وتوصل بإعدادات الخاصة بهاتفك و من بين هذه الطرق التي يمكنك تشغيل بها أو إرسال إعدادات الهاتف :
*طريقة رقم 1 : عن طريق إتصال بمصلحة الزبناء إنوي :
في حالة حدوث مشكلة في إتصالك بشبكة إنوي inwi أو غير ذلك يمكنك إتصال بمصلحة الزبناء 220 ثمن المكالمة درهم واحد 1DH ، أطلب منهم إرسال إعدادات  MMS /WAP / INTERNET 3G الخاصة بالهاتف .
*طريقة رقم 2 : عن طريق موقع إنوي Configuration inwi :
من مميزات موقع Configuration inwi أنه يوفر لك إعدادات  MMS /WAP / INTERNET 3G مع تفعيل أنترنت في كارت سيم Carte SIM .
لتفعيل و إرسال إعدادات إنوي في هاتفك من موقع إعدادات إنوي  :
 يجب أن تتوفر على كارت سيم إنوي Carte SIM
 أدخل إلى رابط إعدادات إنوي الخاصة بالهاتف Configuration inwi :
 ضع رقم هاتفك ثم إضغط على VALIDER
4ـ ستصلك رسالة من الموقع فيها رمز مكون من أربعة أرقام ****
  انتظر ....
ضع الرمز **** 

تم إضغط على  VALIDER
 إختر نوع هاتفك إذا لم يسبق لك دخول إلى الموقع أو إتصال بمصلحة inwi من أجل تشغيل أنترنت .
 Votre marque 

Votre modèle 
6- إختر إعدادات الهاتف التي تريد إرسالها
ثم إضغط على CONFIGURER من أجل إرسال رسائل برمجة  MMS /WAP / INTERNET 3G
أو يمكنك مشاهدة مواصفات هاتفك بالضغط على DETAILS
6ـ مبروك ثواني وستصلك رسائل البرمجة الخاصة بنوع هاتفك الذي اخترت


مصدر الموضوع مدونة أبو إياد أربعة طرق تشغيل أنترنت إنوي inwi على جميع الهواتف | Blog CosPi http://cos-pi.blogspot.com/2014/11/configuration-inwi-mobile.html#ixzz5VoeLh2ZT

الجمعة، 2 نوفمبر 2018

Install TutuApp Helper without Jailbreak for iOS devices and Android troubleshooting

Smartphone is common device for human and iPhone devices are becoming status to show off. But do you know that you can’t install third party apps in iOS devices without jailbreaking. You can only install apps from authorized iOS store without jailbreak. If you want to enjoy additional functions and apps from the ones available then you need to jailbreak your iPhone. But now you can use Tutu App helper by which you don’t need to jailbreak your iOS devices.
Intall TuTuApp Helper
Steps to download and Install TutuApp Helper
  1. Before start any process of installation please take backup of your device in case of device crash.
  2. You must have latest and updated version of Safari browser installed in your device. Check and update it if you don’t have the latest one.
  3. Visit tutuapp.com from safari browser.
  4. Load the entire webpage and tap on the big Download Now Remember that you are installing regular version of Tutuapp.
  5. A pop up will say “Tutuapp.com would like to install tutu helper regular version. Do you agree?” Press the agree button. Tap on Accept and then install button.
  6. Completing above steps successfully you will be able to see app symbol at home screen of your device. One more step is still pending so don’t try to open app.
  7. Go to Setting->Device Management->Distribution Winner Media Co-> Trust the developer
  8. TutuApp helper is successfully installed in your iPhone device, launch it and perform setting as per your priority & other additional features. It allows you to install many useful third party iOS apps.
download TuTu App techtyre
Note: New TutuApp is available now. For user who has already purchased the VIP version, you can enjoy VIP privileges in the TutuApp 2.0 version. Now you can enjoy many premium apps for free.
Fixing of TUTUAPP Error “Could not be download at This Time” for Android devices
Tutuapp is a good Alternative option of the Play store. You can download Tutuapp through the various websites listed on google or official website tutuapp.com. If you’re facing an error while downloading tutu application in your Android devices then most of us can face this message “Could not be download at this time error”. It means you are not able to download this application in your android devices. Let’s try to find out the reason of this message and solution.
  • The main reason of this issue is that you are trying to install older version TutuApp. I suggest you to look for the newest version and then perform download and installation in your Android phone.
  • Another common reason is internet connections failure. If you are using a slow internet connection or less mobile tower area speed connection then you may get this error. Try to use WIFI or fast wired internet connection to download it in your device.
  • You can get this error if your android device has less storage system. Older version of android operating system uses less storage space compare to current upgraded android OS version. So upgrade android version.
  • Fourth Cause, after successfully download if you’re receiving this message then go to settings of your device and enable unknown sources app setting and then you will be able to install this application for sure. Make sure to disable it after successful installation.
  • Still if you’re getting an error during installation then your device may not be compatible with Tutuapp software so try to change your device and install it. Else you need to contact some android developer and root your device first in order to install this application.TuTu Error techtyre
Still if you’re facing any then do let us know in the comments we will be happy to reply with the answer to your concern or issue.

How to Disable Software Update Notification for iPhone Device with and without jailbreak


Apple company release new software updates often for security purpose, features and user suitability. It may be chance that iPhone users can tap on updates button if they receive update notification continue. It’s more harmful for jailbroken iOS device because update will remove your valuable jailbreak and important data loss. It’s advisable to not update iPhone OS without confirming either its bug free or not, new added features or how it will affect your current apps of smart phone. Jailbroken iphone users need to wait until they find suitable jailbreak for new software updates.
We have two methods to get rid from this problem and disabling OTA (over the air programming) updates, notification in you iPhone for jailbreak and without jailbreak. The first method made for jailbroken and stock iOS devices and the second one only made for jailbroken devices.

Method 1 Non – Jailbroken Devices

Disable methods for OTA updates is easy process in which you need to install tvOS beta software profile to “enroll” your iphone into the Apple TV beta software program. Iphone will find only tvOS default and search for tvOS updates and terminate by assuming no iOS updates are available. In this example we’ve used slightly older tvOS beta profile because apple is very conscious to solve issues. Apple may fix below example version with new updates.

Step 1. Download & Save Apple’s tvOS Beta Profile

This above profile was sourced from beta Profiles. You will notice tvOS 12 profile is also available on the webpage but there may be risk for your iOS device become nonfunctioning in the event for future security patches updates. iPhone screen pop up below message you need to Hit “Allow” to confirm, and proceed to the next step.
Hide Jailbreak OTA notification

Step 2. Install the tvOS Beta Profile

You will redirect to install profile page for tvOS 11 beta profile which already downloaded. Tap on install and then press “install” as below showing in below screen.
method 1.2
Confirm for final installation by pressing “install” button bottom of the screen. Device will ask for restart the device to apply the changes after installation, so press on “Restart” on the prompt that appears.
Method 1.3
This beta profile doesn’t interfere with other installed profiles. If you have preloaded iOS 12 beta then the tvOS beta profile can still be installed without removing the previous profile. Your iPhone will still work normally but it will detect any iOS updates, including beta ones.

Step 3. Verification

After reboots complete you need to ensure that the tvOS profile has installed and not able to receive iOS update notifications. Open the Settings app and tap “General,” then tap on “Software Update” on the following page.
Here you may find few red notification reminders. Upon getting “Software Update” page, you’ll be directed to the blank page that displays your current firmware with a notification saying that your software is up to date. From now, you will never receive any OTA updates even for new iOS software updates.
Method 1.4

Step 4. How to Re-Enable OTA Updates

Sometimes it’s become necessary to perform OTA updates. To do this Go to “Profiles & Device Management” page – >under “General” within the Settings app – > select “tvOS 11 Beta Software Profile.”
Tap on “Remove Profile,” and follow the steps of deletion. You don’t need to reboot your device after removing the tvOS profile. Reboot your iphone manually after complete removal of profile. Turn it back on for the settings to kick in.
Method 1.5

Method 2: For Jailbreak Devices

This method is specially made for jailbreak device where you will find additional option of installing a tweak to keep OTA updates hide.

Step 1. Add Karen’s Repo

This tweak isn’t available in Cydia outright. You’ll first have to insert a separate repo in order to get it. Open Cydia and tap on “Sources” along the bottom of the screen to move repository page. Tap on “Edit” on the upper-right corner, followed by “Add” on the upper left.
Method 2.1
A URL prompt will appear when you will press “Add”, input cydia.angelxwind.net into the empty field. Tap on “Add Source” when done and wait for the repo to install. Hit “Return to Cydia” once the process completes, and began to the next step.
Method 2.2

Step 2. Install Mikoto

Now open Cydia’s search function by on the lower right of the screen. Search for “mikoto” in the search bar, and tap on the tweak once it appears in the results field.
Method 2.4
Tap on “Install” button found in the upper right to proceed to the tweak’s verification page. Select “Confirm” in the upper right to complete installation. Hit “Restart SpringBoard” after it’s done to apply in your iPhone and interact with the installation.
Jailbreak iPhone

Step 3. Installation Verification

Once iPhone respring will complete you have to make sure that Mikoto has installed effectively. Open settings and tap on “Mikoto” to access its settings page. You will find  “Disable OTA Software Update” is enable and which can’t be switched off. For the safety purpose performing an OTA update on your jailbroken iPhone can cause malfunction and resulting in a continuous boot loop.
Mikoto entirely blocks your iPhone’s ability to search for and receive OTA updates. The tweak also completely gets rid of the “Software Update” tab within the “General” page in the Settings app, with the red bubble alerts which notify you of available updates.
Jailbreak OTA notification

Step 4. Re-Enable OTA Updates

Re-enabling iOS software updates on your iPhone complicated. You can uninstall Mikoto to return the ability of receiving update notifications. OTA update can be risky in jailbroken devices and result in a soft brick.
That means, you need to un-jailbreak your iPhone if you want safely update to the latest iOS firmware — whether over-the-air or through iTunes. You can perform this many ways, from installing a tweak from Cydia to do the task, to entering DFU Mode and restore your iPhone through iTunes on your computer.

Get Free Fast Unlimited Internet for Android Users

Today we need internet to perform any type of work however we have to use fast 3G/4G internet connectivity to perform the job smoothly. The SIM or internet service providers cost you additional for this. But if you’re android user then you can easily use free 3G or fast mobile data. There are many rumors which claim for free internet connection, well I have performed some research and found that few of them really work.
Here I am going to share several tricks by which you can get free high speed 3G internet connection on your smart phone device.

Benefits

  • You don’t need to pay additional amount.
  • No technical skill require, if you know to operate android device then you can perform setting easily.
  • No need to scare for virus and other harmful malware.
  • You can surf SSL secured websites too such as twitter, youtube, gmail, facebook etc.
Requirement
  • You should not have mobile balance
  • You must have an active data plan with 0 MB balance.
  • The method or setting works well with all versions of Android, but preferably Android 4.0 or higher are recommended
  • The method works for all android mobile, devices or tablets
  • Rooted Android 4.0 or higher OS version device

1. VPN Method For Free Internet

There are many VPN (virtual private network) Service provider which you can use to connect internet. Doing some changes in VPN software connects internet virtually, so you’re not charged for internet surfing. It’s simple to configure with faster internet connection.
Droid VPN
To use this you need a rooted android device and Airtel SIM card with null balance.
  • Download and Install Droid VPN from Google play store.
  • Register with username, password and legal email address.
  • Click on Connection Setting – > Connection Protocol – > Select TCP option
  • Tap on HTTP Headers – > Tap check box to Enable
  • Type on Custom HTTP Headers “Host:get.wynk.in/X-Online-Host:get.wynk.in/” and click OK
  • Open Droid VPN – > select any available connection – > click on connect button. You connect to Droid VPN now.
  • Surf browser, Youtube video, Play games, check emails without any mobile data balance.
Fly VPN
The Good thing of this technique is you don’t need to download this VPN software in your device. It can work without download and Installation.
  • Click on Setting – > Wireless and Network – > Select VPN
  • Click on + sign on top right corner to add new VPN
  • Give name as “FlyVPN” or whatever you want
  • Select Type as “PPTP”.
  • Add Server address of your particular country. You need to register to get this IP address. It will be in XXX.XXX.XXX.XXX format.
  • http://www.flyvpn.com/User/VpnServers
  • Select Check “PPP encryption (MPPE)” and Save
  • Click FlyVPN to connect
  • Enter credentials which you have used during registration and click connect

Other VPN
There are many VPN apps which you can download and perform specific configuration to connect free internet such as izzyvpn, FinchVPN, Freedom VPN, Globus VPN Pro, EasyOVPN, TroidVPN and many more. The installation, setup and use of all those VPN apps are almost same. You may find other latest software too from search. Ensure that you can use them for free high speed internet connection. Almost all VPN software supports android users.

2. Apps Method For Free Internet

Element53 Lite and ProxyDroid
  • Install Element53 Lite and ProxyDroid from Google play store.
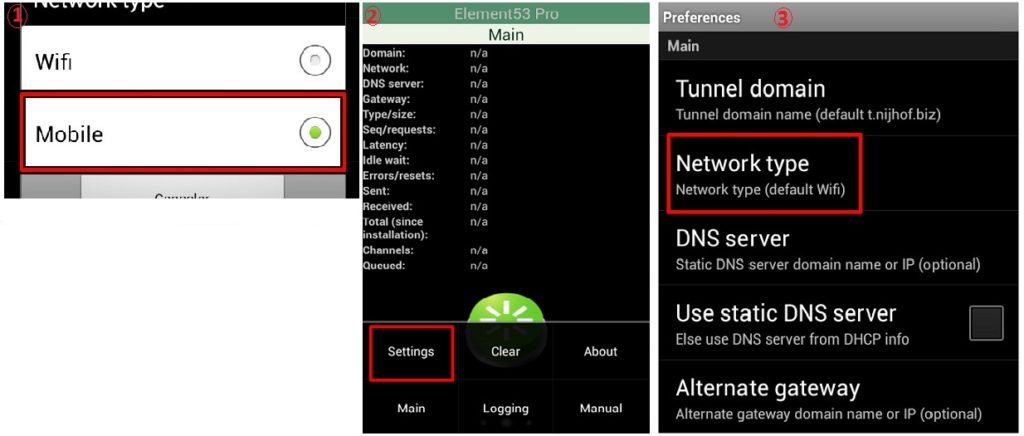
  • Launch Element53 and press the menu button – > setting – > Network Type – > Mobile
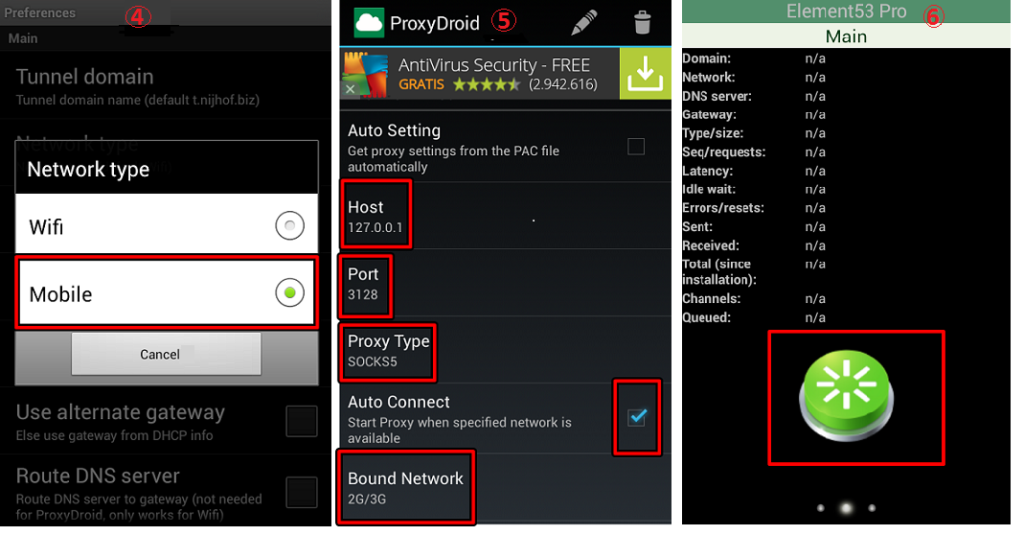
  • Launch ProxyDroid and do below setting
    • Host: 127.0.0.1
    • Port: 3128
    • Proxy Type: SOCKS5
    • Auto Connect: Checked
    • Bound Network: 2G/3G
  • Active your Mobile Data
Free Unlimited Internet Android
Free 3G/4G Internet Android

Open Element53, click Connect and it’s done.
WiFi Password
It’s very simple app to download for android device users.
  • Download, install WIFI password app from Google Play Store. Enable GPS.
  • This app allows you to create random keys for the Wi-Fi network.
Security Type:
WEP 64/128/256
WPA2 64/160/504
  • Algorithm generates a password for your router, entirely random to avoid molest by crackers/ hackers on the device.
  • You can create a random password of strong encryption with one click, which really boost their protection.
  • You can find all open networks of city.
  • It will automatically scans all accessible wi fi connection points and connect
  • After connected you can use your device as an access point to the wireless network.
Opera mini achusoft
This trick is only useful for Airtel SIM card operators. Opera mini is made for android operating system to bypass Airtel internet.
  • Uninstall previous opera browser and restart your device. Download and Install Opera Mini.
  • Setting > More > Mobile network Setting
  • Select Subscription
  • Go to access Point Names Option > New VPN > Insert below data and save.
Name : AchusoftConfig
APN : airtelgprs.com
Proxy : 141.000.011.253
Port : 80
Now you’re ready to surf unlimited free internet with high speed in opera mini browser.

3. Proxy Setting Method For Free Internet

You will get unlimited free internet access on networks like Idea, tata docomo, Reliance, Vodafone, Airtel by paying nothing on smartphone. Just follow these steps. Mobile users have to download and update UC browser V 7.2 Handler UI 200 beta 5.
Airtel Users
First Create New Settings.
Proxy – 67.117.201.129
Port – 80
Front Query – fb.me/cgi-bin/nph-proxy.cgi/000000A/http/
Idea Users
First Create New Settings.
Proxy – 115.117.201.129
Port – 8080
Front Query – fb.me/cgi-bin/nph-proxy.cgi/000000A/http/idea
Docomo Users
Network Name – Tata Docomo Dive in
Proxy – 10.124.94.7
Access Point – TATA.DOCOMO.DIVE.IN
Reliance Users
Proxy – 54.117.201.129
Port – 8080
Front Query – fb.me/cgi-bin/nph-proxy.cgi/000000A/http/rcomwap
Let me know in comments which method works for you to connect internet for android device. Best of Luck.
Must Read

السبت، 27 أكتوبر 2018

شرح انشاء حساب باي بال وتفعيله بالكامل 2018


شرح انشاء حساب باي بال وتفعيله بالكامل 2018


شرحنا لليوم يتضمن انشاء حساب paypal يرسل ويستقبل وتفعيله ب بطاقة ائتمانية (فيزا كارد ، ماستر كارد ، حساب بنكي) طبعا الطريقة مدعومة في الدول المحظورة وغير المحظورة ويمكنك انشاء حساب من اي دولة تريد (امريكي ، كندي ، ايطالي ، مكسيكي ، سعودي) الخ...


ويتضمن فيديو شرح كامل للمبتدئين عن طريقة الانشاء :
كتابة الايميل واختيار كلمة المرور
الحصول على معلومات وهمية للتسجيل ( اسم اول و اخير ، عنوان سكن ، رقم هاتف وهمي ، تاريخ ولادة وهمي ، مدينة ، رمز بريدي )

شرح كل هذه واكثر موجود داخل الفيديو :


رابط موقع paypal (هناPAYPAL
رابط موقع المعلومات الوهمية (هنا)


رابط موقع الفيزا (هنا)

الجمعة، 26 أكتوبر 2018

3 طرق لربح 5000 دولار شهريا


اليوم ولأول مرة أكشف الغطاء عن أكثر 3 طرق فاعلية أستخدمهم شخصياً للربح من الإنترنت فقد حان وقت مشاركة هذه الطرق وكيفية تطبيقها مع الجميع " مجاناً"


ربح المال من الانترنت

الربح من الانترنت 3 طرق لربح 5000 دولار شهرياً


لا داعى لمقدمة طويلة لأن الطرق شرحها سيطول دعونا نبدئ على بركة الله ولكن فقط أحب أن أنوه أن هذه الطرق تحتاج إلى تطبيق لا تحكم على شئ بدون أن تخضعه للتجربة أولاً حتى يكون حكمك مبنى على تجربتك الشخصية .


الطريقة الأولى PBN آمنة


الربح من الانترنت
هنالك مجالات عربية وأجنبية يمكنك أن تربح منها شهرياً ما يزيد عن 1000 و 2000 دولار من خلال جوجل أدسنس أو الأفيلييت ولكن هذه المجالات تتسم بمنافسة صعبة للغاية ولتحتل نتائج متقدمة فى مثل هذه المجالات ستحتاج إلى عمل شاق وطويل ولكن الأن هنالك حلول مجربة للصعود بموقعك للصفحة الأولى فى مثل هذه المجالات الشرسة وأحد أفضل هذه الحلول على الإطلاق هو Private Blog Network

ولكن ليس أى بلوج نيتورك يمكن لها أن تحقق لك ما تطمح له بل بالعكس تنفيذها بشكل خاطئ قد يعرضك أنت وموقعك الرئيسى للخطر والعقاب من جوجل لأن كما يعلم الجميع هذه الإستراتيجية التى ساعدت الألاف حول العالم فى تحقيق مئات الألاف شهرياً تعتبر Grey HAT SEO وبها مخاطرة ولكنها محسوبة إذا تمت بشكل سليم .

متطلبات إنشاء PBN آمنة وناجحة ؟

  1. إستضافة تقدم عدد لا بأس به من الـ Dedicated IPs
  2. عدد لا يقل عن 6 دومينات ذات أوثورتى + Whois Guard
  3. عدد لا يقل عن 6 تدوينات فى الـ 6 مواقع
  4. تنويع فى نوع منصات المحتوى فى الـ 6 مواقع
  5. قالب مختلف لكل موقع من المواقع الـ 6

الإستضافة : هى الحلقة الأهم فى البلوج نيتورك ونحن نحتاج لإستضافة تقدم Dedicated IP لكل موقع سنستخدمه داخل سيرفراتها , لأن الحل البديل هو إستخدام إستضافة مختلفة لكل موقع للحصول على IP مختلف , وهذا سيكون مكلفاً بشكل كبير ومرهق أيضاً لأنك ستضطر للتعامل مع الـ 6 إستضافات فى أن واحد . 

وواحدة من أفضل الإستضافات التى تقدم هذه الخدمة هى إستضافة ixwebhosting التى تقدم 3 خطط مختلفة Expert , Unlimited , Business والأفضل بالطبع هى خطة Unlimited لأنه يعطيك 15 Dedicated IP مما يعطيك الفرصة لإنشاء 15 موقع داخل النيتورك الخاصة بك .

قم بحجز إستضافتك لمدة 3 شهور بسعر 65$ ولكن أنا أفضل أن تحجزها لمدة سنة بسعر 107 دولار من IXwebhsoting التى أستخدمها شخصياً فى الـ PBN الخاصة بى . 

هنالك مواقع إخرى تقدم نفس الخدمة ولكن بأسعار متفاوتة مثل :-

1 . Godaddy
2 . Arvixe
3 . BlueHost
4 . SiteGround

الدومينات : أنت فى حاجة لنيتورك لا تقل عن 6 مواقع ولا تزيد عن 15 موقع بحد أقصى وهذا يختلف بناء على قوة المنافسة فى المجال الذى تستهدفه , ولكن على أى حال عدد 6 مواقع هو عدد كافى للغاية لتحقيق نتائج قوية وسريعة فى مجالات متوسطة الصعوبة . 

أنصحك بإستخدام Namecheap لتسجيل الـ 6 دومينات بسعر 60$ دولار حيث إنه يوفر Whois guard مجاناً لأول سنة بعكس Godaddy الذى ستضطر لدفع مبلغ 6 دولار تقريباً لكل دومين حتى تخفى معلومات تسجيله .

الحصول على دومينات ذات أثوروتى : قم بتسجيل حساب جديد داخل موقعExpireddomains.net ثم قم بالدخول على قسم Deleted Domains والبحث فى الدومينات المتاحة ولكن قم بتطبيق الفيلتر الموجود فى الصورة التالية 

الربح من الانترنت


قم بتطبيق الفلاتر التالية :-

أولاً Dropped تابع الدومينات التى تم إسقاطها فى أخر 24 ساعة فقط , فهى الدومينات التى يوجد بها فرص متاحة من دومينات ذات أوثورتى لم يتم تسجيلها بعد , لأن الدومينات التى سقطت منذ أكثر من 24 ساعة لن تجد فيها دومينات مميزة لأنهم تم تسجيلهم بالفعل .

ثانياً PR عليك أن تختار دومين لا يمتلك Fake Pagerank وهو صاحب اللون الأصفر حيث أنه سيعود عليك بالضرر وأيضاً إبتعد عن أى دومين ذو بيدج رانك بالسالب , إختار فقط الدومينات صاحبة البيدج رانك باللون الأخضر أو بيدج رانك صفر . 

ثالثاً BL عدد الباك لينكات لكل دومين يعطيك فكره على قوته , فبالطبع كلما زاد عدد الباك لينكس كلما ذادت قوته من ناحية الأوثورتى والـ Trust flow .

بعد إختيارك للدومين الذى يتوفر فيه هذه العوامل قم بالدخول على OSE وقم بفحص الدومين لتتأكد من بعض النقاط الهامة , أولاً عدد الباك لينكس وعدد الدومينات الحاصل منها الموقع على الباك لينكس و الـ Anchor text .

كلما زاد عدد الدومينات الحاصل منها الموقع على الباك لينكس كلما كان أفضل وكلما تنوعت الـ Anchor text كلما كان أفضل وأفضل , ولكن عليك أن تفحص مصادر الباك لينكس حتى لا تكون من مواقع صينية أو مواقع سبام أو مواقع اباحية . 

التدوينات : لإنشاء بلوج نيتورك قوية ستحتاج محتوى حصرى لكل موقع من المواقع الـ 6 ولهذا يمكنك الإستعانة بخدمات كتابة المقالات المدفوعة على الإنترنت أو كتابة تدوينات بنفسك , وأفضل المواقع الموجودة على الإنترنت التى تقدم هذه الخدمة بأسعار معقولة هو موقع Iwriter وموقع PeoplePerHour

بالنسبة لـ Iwriter التدوينة صاحبة الـ 500 كلمة تكلفتها 3.25 دولار
إذا قمت بشراء 6 تدوينات هذا يعنى 20 دولار تقريباً .

منصات المحتوى : لديك 6 مواقع أنصحك أن لا تنشئ 6 مدونات بل قم بالتنويع , أنا على سبيل المثال فى البلوج نيتورك الخاصة بى يوجد 3 مواقع يستخدمون منصة الـ Wordpress و موقع يستخدم PunBB Forum وموقع على Blogger وموقع أخر على Tumblr . 

فقط قم بربط الدومين بعد أن تقوم بشرائه بمنصة Blogger و Tumblr بدون الحاجة إلى هوست وبالطبع كل من المنصتان لديه IP مختلف وهذا ترشيداً للنفقات نوعاً ما . 


تجنب هذه الأشياء فى النيتورك الخاصة بك
  1. أن تربط أى حساب لك على السوشيال ميديا بموقعك
  2. لا تربط بين موقعين من مواقع النيتورك نهائياً
  3. لا تشير إلى موقعك المستهدف أكثر من 3 مرات فى الموقع بالكامل
  4. قم بوضع أكثر من لينك خارجى داخل تدويناتك ليس موقعك فقط 
  5. قم بالتنويع فى الـ Anchor text التى تستخدمها فى مواضيعك 


الأن أنت جاهز لإطلاق أول PBN لك وفى الصورة التالية 
صورة لأرباحى فى شهر 10 لأحد الخدمات التى أسوقها على موقعى المستهدف
الصورة من موقع Hasoffers وهذا من خلال التسويق لعرض واحد فقط
هذا بعد أن أستطعت إحتلال المرتبة الأولى على الكلمة التى كنت أستهدفها .


الربح من الانترنت


الطريقة الثانية Launch Jacking


الربح من الانترنت


هذه الطريقة بإختصار حتى نبدئ شرح التطبيق أيضاً , عبارة عن قنص فرصة إصدار الـ Digital Products الجديدة ومحاولة الحصول على هامش من الأرباح فور إصدار المنتج قد يصل فى بعض الأحيان إلى 2000 دولار فى أول أسبوع فقط .

تعتبر هذه الطريقة واحدة من أسهل طرقالربح من الانترنت لأنها لها Blueprint واضح وتطبيقه لا يحتاج إلى إبداع بل فقط إختيار موفق وعمل منظم لا غير .

الخطوة الأولى : قم بمراقبة الـ Digital products التى ستصدر بعد أسبوعين من وقت تطبيقك لهذه الطريقة من خلال موقع MunchEye أو JVnotify

الخطوة الثانية : بعد إختيار منتج معين والتقدم لتسويقه عن طريق Jvzoo أو Clickbank قم بتسجيل دومين EMD بإسم المنتج أو مع إضافة كلمة Review له على سبيل المثال منتج Social Marketing Suite يمكنك حجز دومين له بالإسم التالىwww.socialmarketingsuite.com أو إذا كان محجوز يمكنك حجز دومين بإسمwww.socialmarketingsuitereview.com 

قم بكتابة بعض المعلومات عن المنتج من خلال تدوينات جديدة خلال أسبوع من التدوين على الموقع وبناء القليل من الباك لينكس ستجد الموقع إحتل النتيجة الأولى فى جوجل على الكلمة المفتاحية المستهدفة وهى إسم المنتج الذى إخترته . 

الخطوة الثالثة : بمجرد طرح المنتج يجب عليك أن تكثف عملية التدوين حتى تصل فى أول 3 أيام من طرح المنتج إلى معدل تدوينتين يومياً , تستهدف فى عنوان كل تدوينة جملة مفتاحية لها علاقة بالمنتج على سبيل المثال :-

  • Social Marketing Suite Discount
  • Social Marketing Suite walkthrough
  • Social Marketing Suite Testimonials
  • Social Marketing Suite Case study 

وهكذا حتى تجلب أكبر نسبة من الأشخاص الذين يبحثون عن معلومات عن هذا المنتج , الأمر بسيط للغاية أحياناً ليس عليك أن تسوق للمنتج الذى حجزت الدومين بإسمه إذا رأيت أنه لا يستحق أو أنه منتج فاشل ولا يحقق نجاح تسويقى , فيمكنك إستغلال نفس الدومين والتسويق لمنتج أخر يقوم بنفس المهمة التى يقوم بها المنتج القديم . 

الخطوة الرابعة : قم بإنشاء فيديو تسويقى للمنتج مستعيناً بإحدى خدماتFiverr المتخصصة فى هذا الأمر وإنشره على اليوتيوب وضع فى وصف الفيديو رابط موقعك هذا سيزيد من فرصة تحقيقك لمبيعات وأرباح فى فترة قصيرة .

تنوية هام : يجب أن تكون كل هذه الخطوات قد تمت بالفعل بمجرد إطلاق المنتج فتأخرك ليوم واحد قد يضيع عليك فرصة كبيرة فى جنى الأرباح .

الباك لينكس التى ستحصل عليها : إهتم فى أول 48 ساعة ببناء عدد قليل من الباك لينكس لموقعك عن طريق نشر روابطه فى أدلة المواقع التالية :-


أنت الأن على الطريق الصحيح لبدئ جنى أول أرباحك عن طريق Launch Jacking إهتم بوضع رابط موقعك على الفيس بوك وتويتر من خلال التعليقات والـ Tweets خلال أسبوع من إنشائه .

الطريقة الثالثة TOP Reviews


الربح من الانترنت


هذه الطريقة هى الأكثر ربحاً على الإطلاق وحتى لا يطول الموضوع أكثر من ذلك سندخل مباشرة  فى الشرح التطبيقى لها ولكن بإختصار دعنى أشرح لك ماهية هذه الطريقة .

هذه الطريقة تعتمد على المراجعات التى تقارن فيها بين أفضل 5 أو 10 منتجات أو خدمات فى مجال ما وتوصيتك لمنتج معين بناء على رؤيتك . 


ما المطلوب منك حتى تنجح هذه الطريقة ؟

  1. دومين EMD مثلTop10stockimages.com
  2. تحضير مراجعة شاملة لكل موقع من العشر مواقع
  3. حملة باك لينكس أو حملة مدفوعة الإختيار لك .
أولاً الدومين : سوف تحتاج أن تسجل دومين به الكلمة المفتاحية الرئيسية التى تستهدفها ويسبقها كلمة Top10 أو Top5 وأنصحك أيضاً أن تخفى معلومات تسجيلك عن طريق Whois Guard .

ثانياً الإستضافة : أى إستضافة متوسطة ستفى بالغرض لأنك لن تحصل على ترافيك كبير بل ترافيك مستهدف بأقصى درجة وهذا هو ما يجلب الأرباح , أنصحك بـ Arvixe لأسعارها المعقولة وجودتها العالية .

ثالثاً السكريبت : يجب عليك أن تستخدم سكريبت مخصص للـ Top reviews وليس وورد بريس وأنصحك كثيراً بهذا السكريب الرائع Top Reviews Script بـ 15 دولار فقط وتركيبه على السيرفر سهل للغاية .

رابعاً مصدر الأرباح : يجب عليك أن تشترك فى شبكات إعلانية كبيرة لتحصل منها على حقوق التسويق للمواقع والخدمات الكبرى وهذه الشبكات بالترتيب هى :-

خامساً التسويق لموقعك : هنالك عدة طرق لتسويق هذه المواقع ولكن أكثرهم فاعلية وأسرعهم عائد هى الـ PPC فإستغلالك جوجل أددورز للإعلان عن موقعك فى محرك البحث جوجل مستهدفاً بعض الكلمات المتعلقة بالكلمة الرئيسية التى تستهدفها لعدة أيام كفيل أن يأتى لك بعائد خرافى . 

أنصحك إذا كان معك كوبون جوجل أددورز ولم تستغله حتى اليوم فقط قم بدفع 25 دولار لتنشيطه وإستخدمه الـ 100 دولار , إستخدمه لمدة 3 أيام وشاهد العوائد التى ستحصل عليها من إستغلالك هذه الطريقة الرائعة . 

الطريقة الثانية : هى Sponsored Adsعلى الفيس بوك فهذه أيضاً طريقة مجربة وفعالة للغاية فى التسويق لمثل هذه المواقع فى فترة قصيرة هنا لا أتحدث عن Sponsored posts ولكن أتحدث عن الإعلانات التى تظهر مباشرة فى السايد بار أو أسفل البوستات المختلفة الأمر مكلف قليلاً ولكن عائد تسويق خدمة أو موقع واحد يعادل 10 أضعاف ما ستنفقه على الإعلان . 

سادساً إستغلال الـ Video Marketing : قم بالذهاب إلى موقع Odesk وقم بطلب خدمة جديدة Video Production قد تكون مكلفة بعض الشئ على حسب إحترافية من يقدم هذه الخدمة , ولكن عوائدها أيضاً فى منتهى الروعة وهذا بناء على تجربتى الشخصية فربما فيديو واحد يشاهده 1000 شخص يجلب لك 100 عملية تحويل × 150 دولار على سبيل المثال : 15 ألف دولار . 

وهذا نتاج تطبيق هذه الطريقة فى شهر أكتوبر , وهذا بعد أن قمت بتسويق الموقع عن طريق Google Adwords لمدة 15 يوم , الصورة من موقع ShareASale .


الربح من الانترنت


لقد إنتهينا الأن من أفضل 3 طرق للربح من الإنترنت 
أتمنى أن يكون الموضوع قد غطى أكبر قدر من المعلومات التطبيقية